|

Custom Search
Welcome to the Cocktail Mixing GuideThis is cocktail mixing made easy. Here we explain all the terms and methods used in cocktail and shooter mixing. Look out for some useful bartending tips.

Cocktail mixing is about enjoyment for you and your guests (or clients). The cocktail recipe – like any other recipe – is merely a guide to cocktail mixing. There is no need to stick to it precisely. You can and should experiment by adjusting proportions of ingredients and adding and subtracting ingredients. You can also experiment with the decoration – or garnish (see below) – of your cocktails.
BARTENDING TIP: Most cocktails do not have water as an ingredient according to its recipe. However, if you think a mixed drink needs a bit of water to get its taste right, add a dash. Or add fruit juice if you feel water dilutes the taste too much. Apple juice is usually a good choice as it has a fairly neutral taste. 
Here we go with the terms and techniques used in cocktail mixing, conveniently arranged in alphabetical order:
This is done with an electric cocktail blender. You can also use a hand operated blender, but it is not as effective. Place the ingredients in the blender. If you need to add ice, use crushed ice to minimize the strain on the blender’s blades. Start on a slow speed and gradually increase it. Blend for about 10 seconds or until the blend is smooth. Click here for Cocktail Mixing Master's cocktail blender reviews.
Building means to pour the ingredients on top of one another in the serving glass. This is usually done in the sequence the ingredients are listed in the cocktail recipe. This is a cocktail mixing technique often used for non-alcoholic cocktails.
Do this by keeping the glass in the freezer or putting ice and water in it for a few minutes. The two methods combined works well if you need to chill glasses in a hurry.
BARTENDING TIP: Always handle a glass by its stem or handle (if it has one). This prevents your hand from warming the drink. It also prevents finger marks on the glass.
A small amount (about 10 ml / 0.3 Oz. depending on the size of the drink) splashed into the glass. Bitters, sauces, syrups and other strong substances are usually added in dashes.

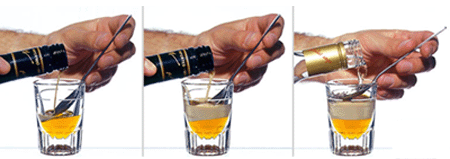
This is a technique commonly used in mixing shooters. Slowly pouring the final ingredient on top of the cocktail over a bar spoon so that it does not mix with the rest of the ingredients (see our Cocktail Bar Equipment Guide page for what a bar spoon is).
Wet the rim of the glass by dipping it in a saucer with water or egg white or by running a slice of fruit (like lemon) along the rim. Then dip it in a saucer with sugar or salt (in the case of Margaritas) to give it a frosted effect around the rim. Some mixologists refer to frosting as the effect on glasses stored in ice or a fridge.
A drink is frozen if it's blended with a large amount of cruched ice, resulting in a thick consistency. Daiquiries are often served frozen.
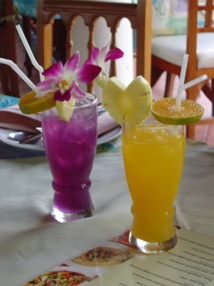
Just as a cocktail needs to taste good, it needs to look good as well. Forget multicolored plastic straws and umbrellas. You want to garnish your drinks mostly with fruit that is edible. Make sure the garnish you use is fresh. The specific garnish used, can give a hint about the taste of the cocktail. For example, lemon or lime can indicate a tangy, citrussy taste. A cherry can indicate a sweet taste, like in the case of a Sweet Martini. Here are a few ideas to try out:

Ø Cocktail cherry on a cocktail stick Ø Stuffed olive on a cocktail stick (think Dry Martini) Ø A “sail” – a whole slice of citrus fruit on a cocktail stink, folded like a mast, with a cherry inside Ø A “twist” – a narrow piece of fruit zest (the outside part of citrus peel – it does not include the sort white part of the skin), folded or twisted and dropped in the drink, or draped on the brim of the glass Ø A wedge of fruit (lemon, lime, orange, banana, apple) lodged on the brim Ø A “wheel” – a whole slice of fruit, on the brim or in the glass
BARTENDING TIP: Always fill the glass to slightly below the brim and remember to leave enough room for any garnish going into the glass.
This involves pouring ingredients on top of one another using a bar spoon so that they don’t mix. This is a technique commonly used in mixing shooters. It might be slightly challenging at first. So, expect a flop or two before perfecting it.
As a rule of thumb, spirits with a higher alcohol content have a lower consistency and tend to float on top of those with a lower alcohol content. Therefore the stronger ingredients tend to go into the glass last. This is not always true though, as some liqueurs – like cream liqueur - tend to be thicker and heavier without having a very high alcohol content. In most countries, the alcohol content of the drink is printed on the bottle’s label. BARTENDING TIP: It might be necessary to practice some of the techniques before actually mixing the cocktails. For example, layering (see below) might be slightly challenging at first. So, expect a flop or two before perfecting it - cocktail mixing requires practice to become perfect.
The crushing of leaves, spices or fruit to release the juices. This can be done with a pestle and mortar or a plastic pestle and glass (a plastic pestle so that you don't scratch the glass).
A drink is served neat if it is served without any ice or mixers.
Some cocktails are served in heated glasses. To heat a glass, put a bar spoon in it and fill with hot water. Let it stand for a minute or two and pour out the water. Then take out the spoon. The spoon helps dispense the heat so that the glass does not burst when pouring in the hot water. Alternatively, heat the glass between your hands for a minute before pouring the water in.
Beer pouring can be a disaster in the hand of a novice. Who has not seen a beer poured so that the head (foam) is taller than the rest of the beer itself? The correct way to prevent this is to tilf the glass at a 45 degree angle and let the beer run on the is side of the glass until it's about half full. Then, straighten the glass to produce a head about 3 cm (1 inch) thick.

SHAKE – WITH A COCKTAIL SHAKER This is probably the most commonly used cocktail mixing technique. Put the ingredients (usually with ice) in the cocktail shaker, close the lid and shake vigorously for about 10 to 20 seconds. This is what you do when someone orders a cocktail “shaken, not stirred”. This is one of the most frequently used techniques in cocktail mixing.
A similar technique to shaking with a cocktail shaker, but using a Boston cocktail shaker (see the Cocktail Bar Equipment Guide for details). The Boston shaker has a glass cone, so one needs to be more careful than with an aluminum shaker. Put the ingredients in the glass cone, put the metal cone over it and give it a slight nudge to seal the two cones. Put one hand on the top and one on the bottom and shake. Ensure the glass cone is always at the top when shaking. After shaking, with the metal cone in hand, give it a tap on the side to break the seal of the two cones. Bartenders often shake with a metal bar glass and any other glass that fits into it. You don't have to stick to an official cocktail or Boston shaker.
TIP: Excellent prices on a wide range of products, including cocktail shakers. Visit Cocktail Mixing Master's very own Bar Store for all your bar equipment needs. Shipping across the globe!
This is done right after shaking or stirring. Put a strainer over the bar glass or shaker glass and pour in the cocktail glass. This separates the liquid from the ice used for shaking. It is advisable to buy the strainer in a set with the bar glass and cocktail shaker to ensure it fits properly. Stainers are usually used after stirring a drink or shaking it in a bar glass or Boston shaker. A cocktail shaker normally has a built in strainer.
Put the ingredients in a bar glass or bottom part of a cocktail shaker, with ice if required. Stir gently with a bar spoon until the ingredients are well mixed. Strain the contents into the glass.
BARTENDING TIP: Never use the same ice twice. Once you have shaken or stirred with a lot of ice, discard it and use new ice for the next drink. You want to be using fresh ice that melts consistently for each new cocktail. That is what the pro's say. It of course does not apply when you are running low on ice.

Custom Search
Back to the top of the Cocktail Mixing Guide
|


